
Introduction to SAP Fieldglass for businesses
Article-15881
This resource guide will walk you and your business through basic functions in SAP Fieldglass. SAP Fieldglass is a new procurement tool being used by the Government of Canada that enables you to submit candidates, accept work orders, and submit time and expenses for invoicing for any services contracts that you may hold with Public Services and Procurement Canada.
On this page:
- Register your SAP Fieldglass user account
- Log on to SAP Fieldglass
- Update your password or contact information
- Change notification settings
- Change your language setting
- View work items
- Resend a worker’s invitation
- View draft time sheets
- Submit a time sheet for a worker
- Run reports
Register your SAP Fieldglass user account
A system administrator for CanadaBuys will create your account and invite you to register via email. Follow the steps below to complete this process.
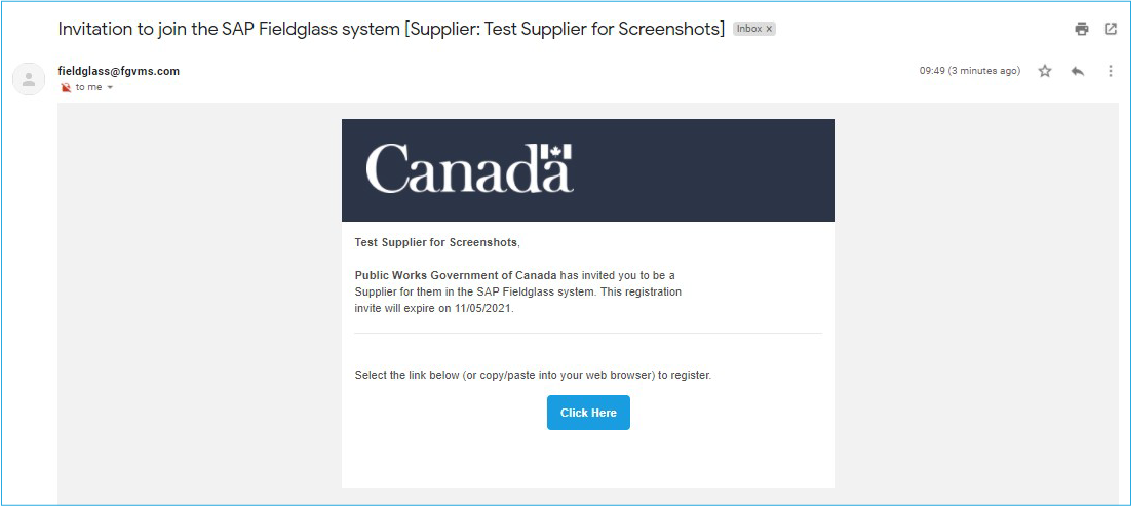
Step 1
Click the “Click here” button in the email you receive to begin registering your SAP Fieldglass user account.
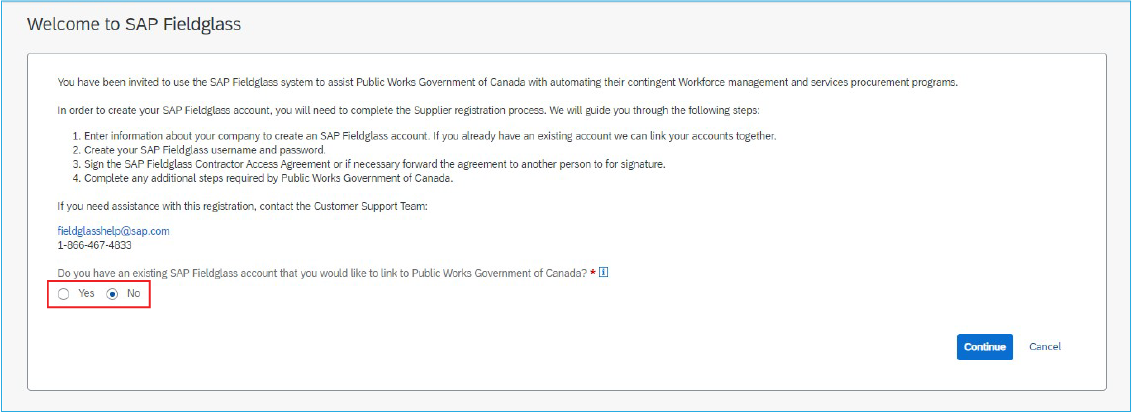
Step 2
The Welcome to SAP Fieldglass page is displayed. If you have an existing SAP Fieldglass account that you would like to link to Public Works Government of Canada, click the “Yes” radio button. If you don’t, click the “No” radio button. Click the “Continue” button to proceed with registration.
Note: Use the link at the top right of the screen to change the language displayed.
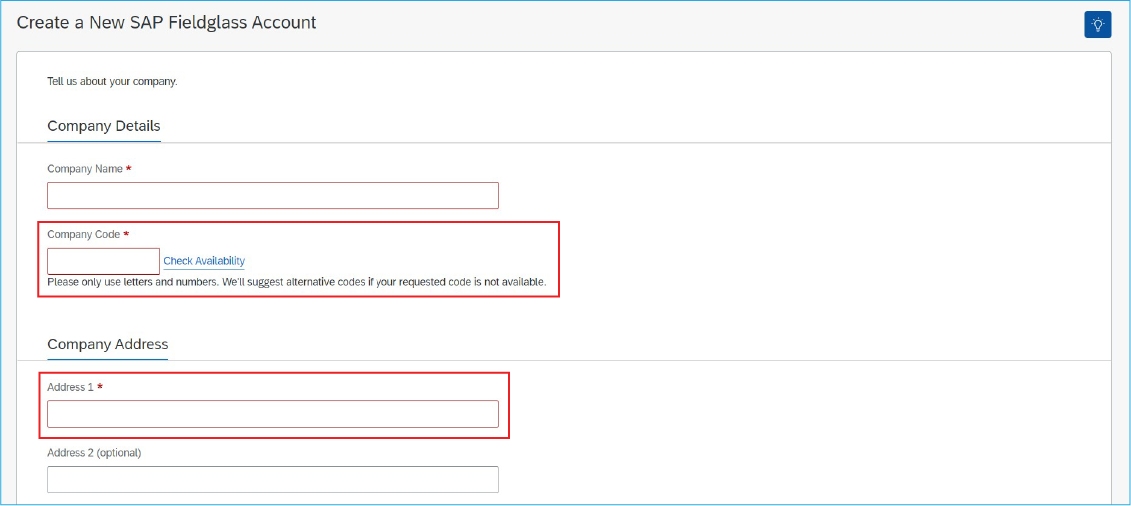
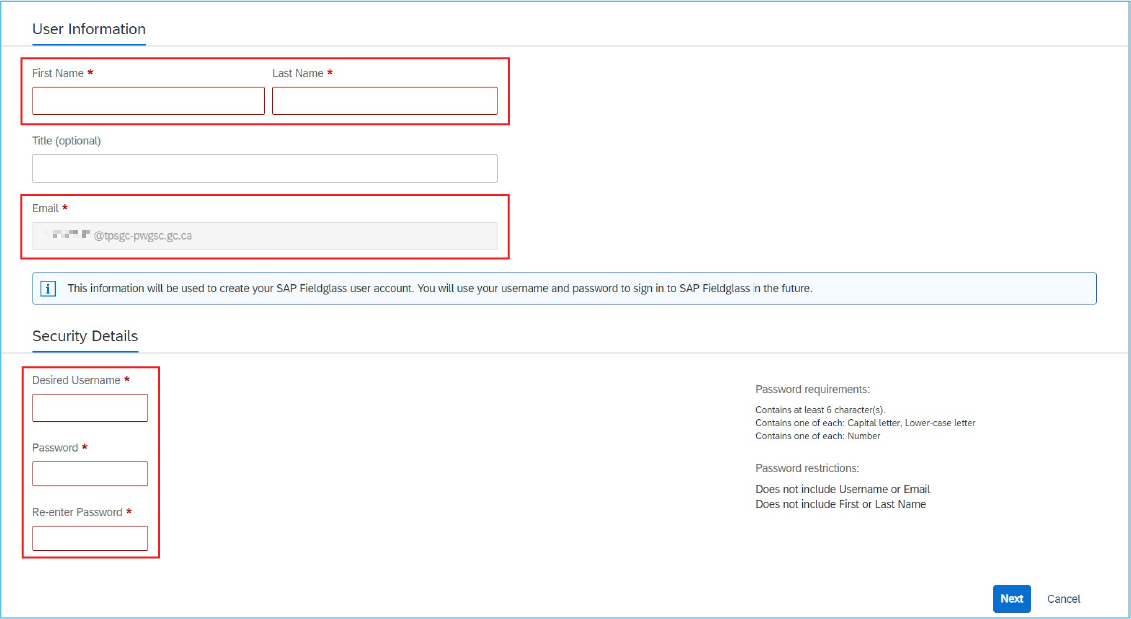
Step 3
The Create a New SAP Fieldglass Account page is displayed. Complete the form by entering the required information, including company name, company code and company address, your first and last name, email, username and password in the fields provided.
Step 4
Click the “Next” button at the bottom of the page once you have completed the required information.
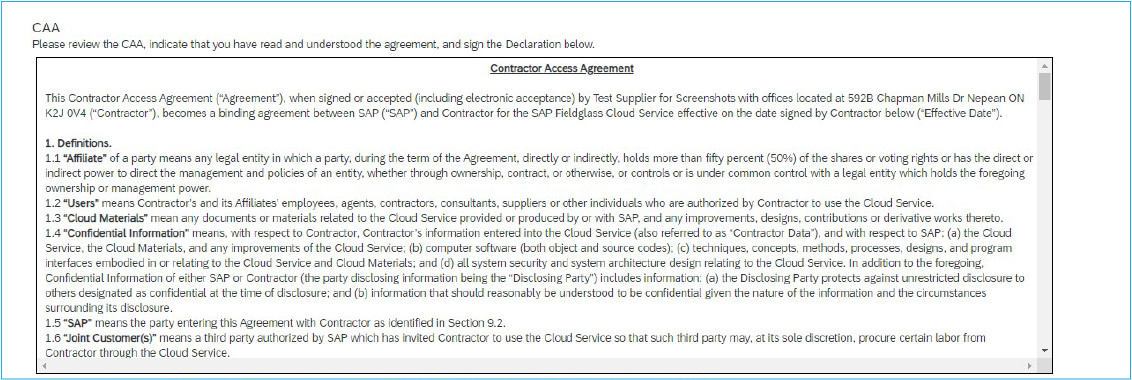
Step 5
The Contractor Access Agreement page is displayed. Review the details and ensure the accuracy of the information. Review the terms and conditions.
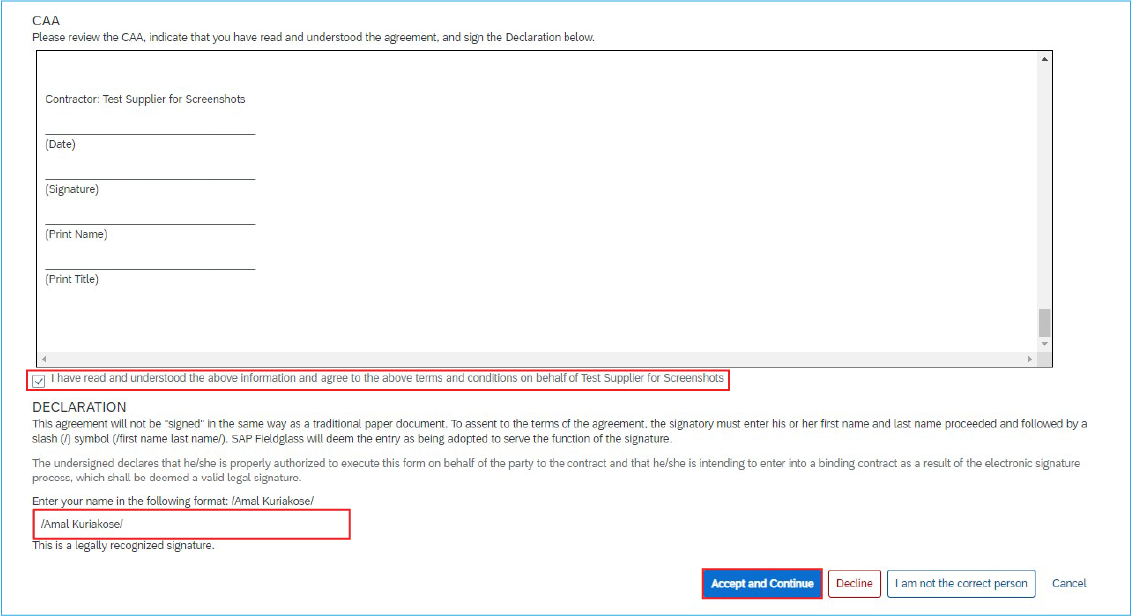
Step 6
Select the check box to declare that you have read and understood the information and agree to the terms and conditions. Enter your name in the described format and click “Accept and Continue.”
Log on to SAP Fieldglass
After you have registered your account, you can log on to SAP Fieldglass following the steps below to view and respond to work items.
Tip: For best performance, it is recommended that you access SAP Fieldglass with Firefox, Google Chrome or Microsoft Edge.
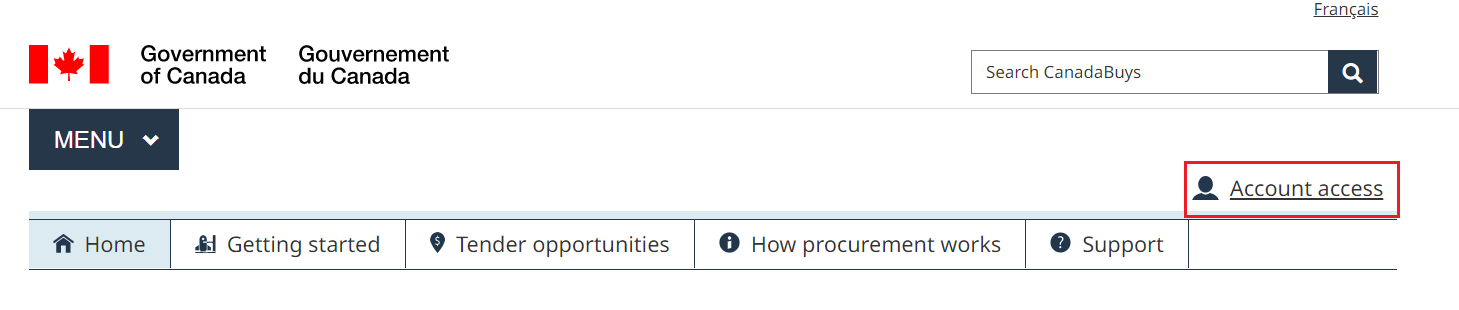
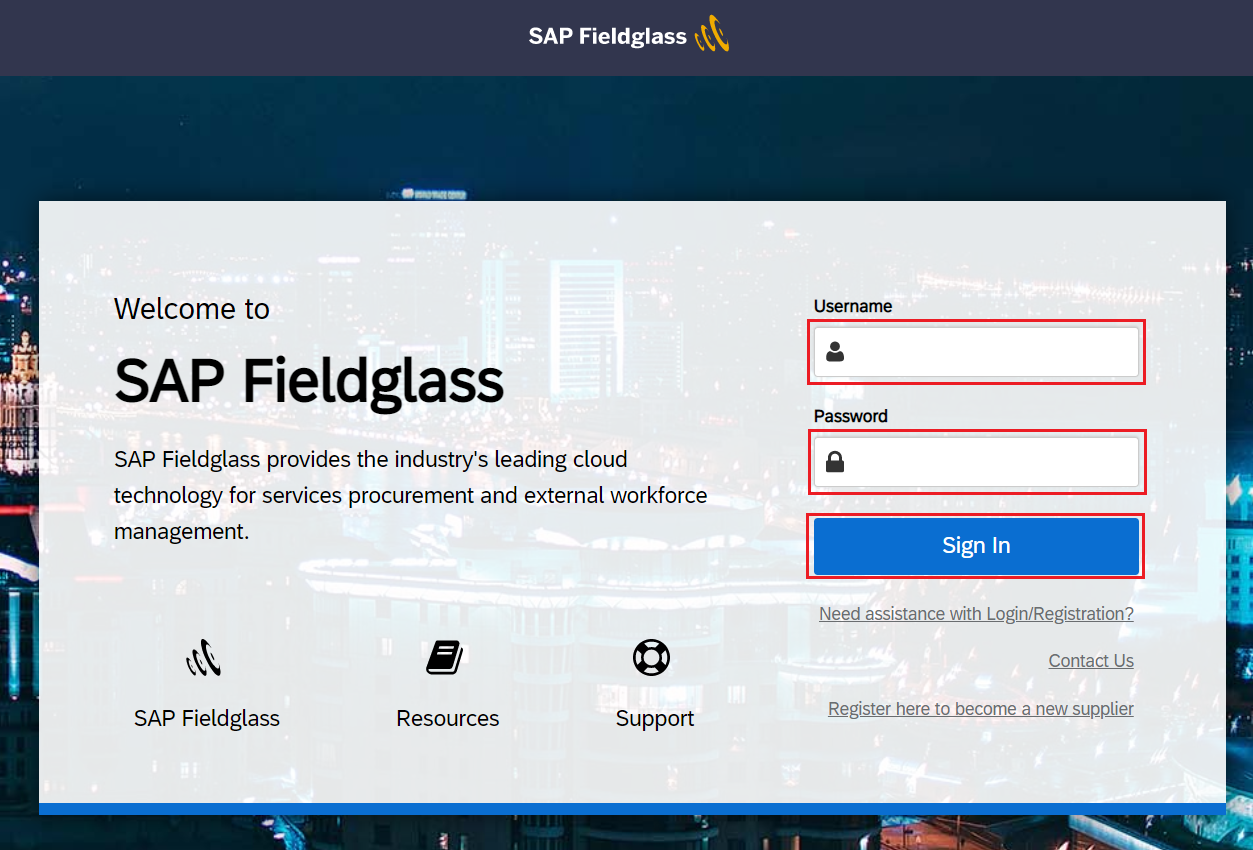
Step 1
Click “Account access” in the top navigational menu of the CanadaBuys website to go to the Account access page.
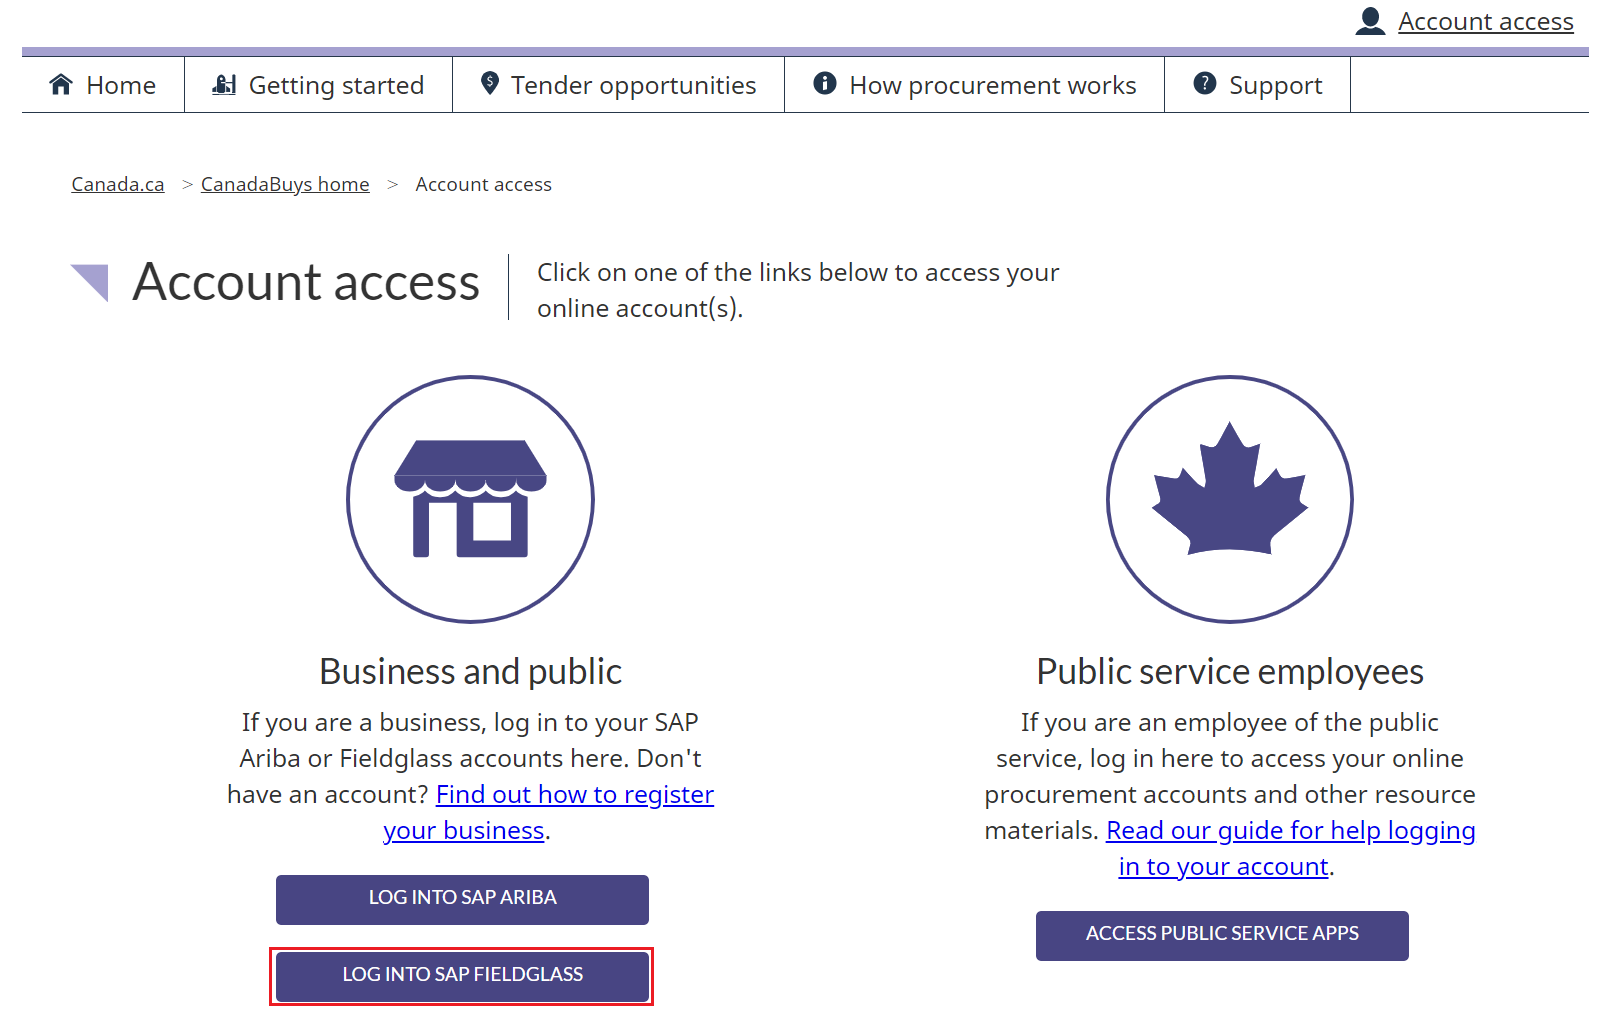
Step 2
Under the Business and public section of this page, click the “Log into SAP Fieldglass” button.
Step 3
On the next page, click the “Continue to SAP Fieldglass” button.
Step 4
You will be brought to the SAP Fieldglass login page. Enter your username and password in the fields provided and click the “Sign In” button.
Update your password and contact information
You can update your password and contact information under My Profile. You should change your password regularly to maintain the privacy of your account. Follow the steps below to do that.
Step 1
Once you are logged in, click your initials in the top-right corner of the page. Select “My Profile” from the menu.
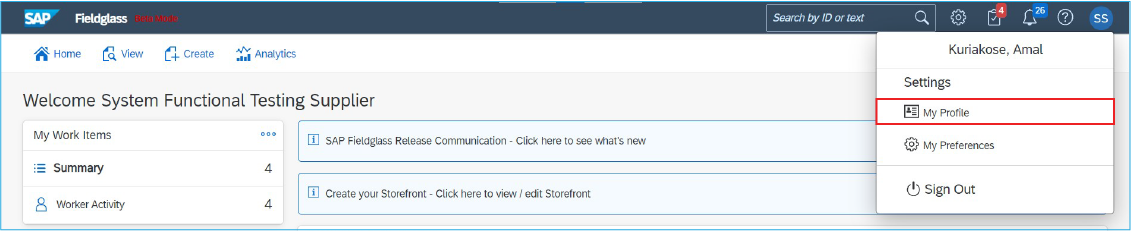
Step 2
The My Profile page is displayed. To change your password, click “Change Password” in the Account Information section.
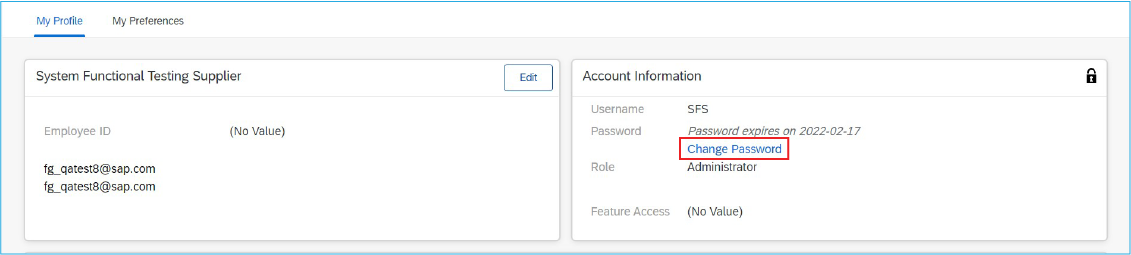
Step 3
The Change Password pop-up window is displayed. Enter your new password information and click “Change.”
Note: Passwords must have at least eight characters, at least one number, and are case sensitive.
Step 4
To update your contact information, click “Edit” in the section where your name is displayed on the My Profile page. From here, you can update the following: prefix, first name, last name, email, cc email addresses, profile picture, address, phone number, fax number, mobile number, and LinkedIn public profile URL.
Step 5
Make the necessary updates and click the “Update” button at the bottom of the page.
Change notification settings
Follow the instructions below to edit what notifications you receive.
Step 1
Click your profile picture or initials on the upper-right corner of the page. Select “My Preferences” from the menu.
Step 2
The My Preferences page is displayed. To edit the types of notifications you receive by email, scroll down and click “Edit” in the Messaging section.
Step 3
Select the types of notifications that you want to receive by email and click “Update.”
Change your language setting
The language in which you see content in SAP Fieldglass depends on the language your internet browser is set to. For example, if you are using Google Chrome and the browser is set to French, then you will see the site in French. If you'd like to change your default language, refer to the instructions below for the browser you're using:
- For Google Chrome, see the article Change Chrome languages & translate webpages
- For Mozilla Firefox, see the article Choose display languages for multilingual web pages
- For Microsoft Edge, see the article Use Microsoft Edge in another language
- For Safari, see the article Change the language your Mac uses
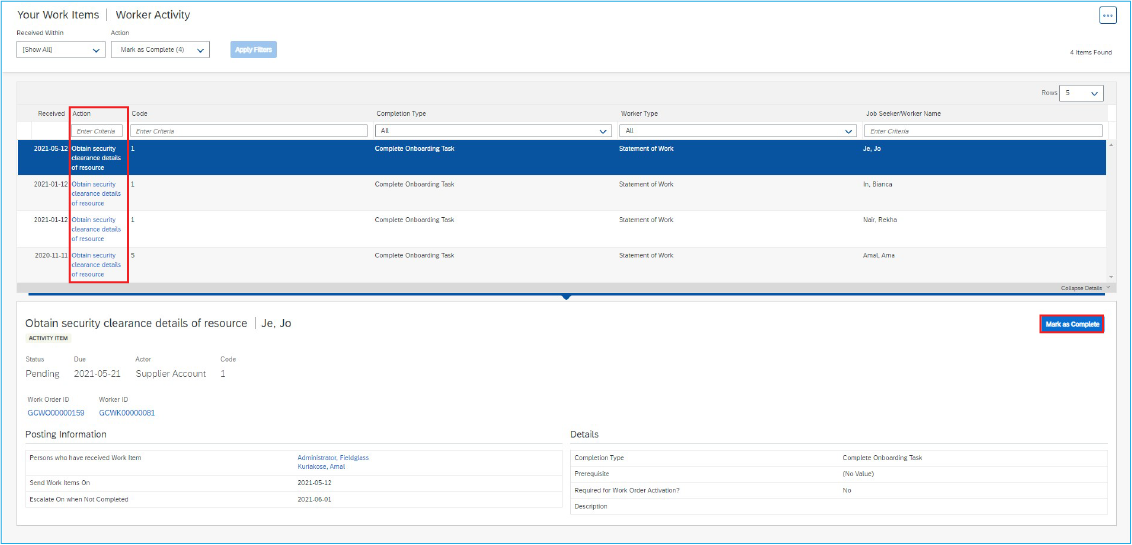
View work items
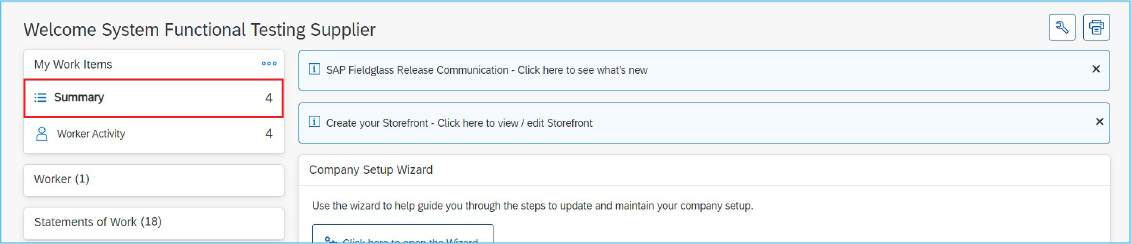
Items requiring action, such as responding to a job posting, can be accessed through your Work Items menu.
Step 1
Click the “Work Items” summary list, located on the left side of the Home page.
Step 2
Select the desired action, such as “Statement of Work / Contract - Approve” for activity items.
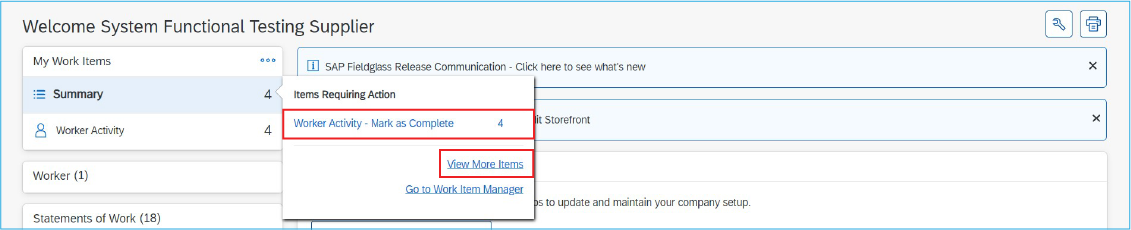
Step 3
The Your Work Items page is displayed. You can take action on an item (for example, “Approve” a Statement of Work / Contract) or you can click an item ID to view more details about the item.
Resend a worker’s invitation
When a worker has been activated by a buyer, they will receive an email invitation to register on SAP Fieldglass. The worker has 21 days to register before the invitation expires. You can resend an invitation if the worker has misplaced the original email, or if it has expired.
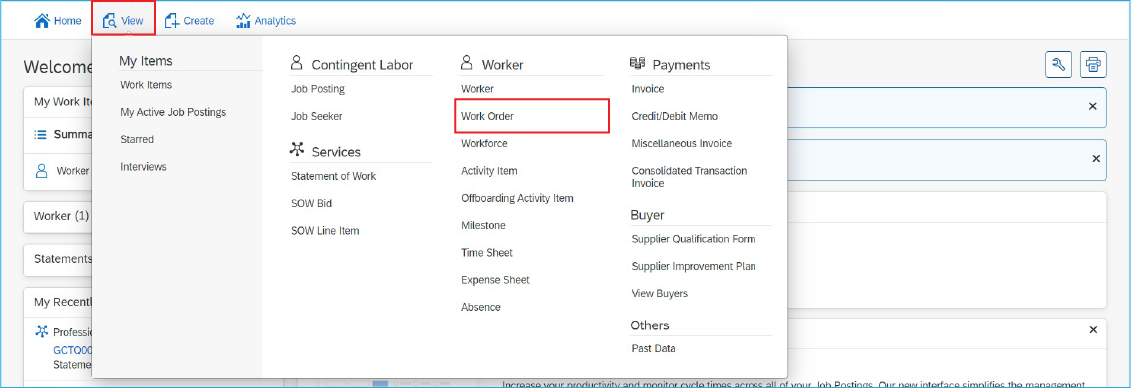
Step 1
From the “View” menu, select “Work Order.”
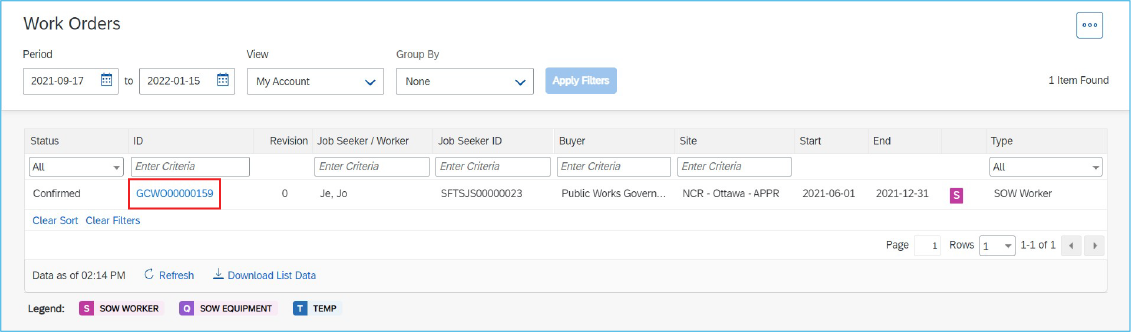
Step 2
The Work Orders page is displayed. Click the ID of the required work order.
Note: The work order must be in “Activated” status, otherwise you will not be able to perform any actions against the SOW, such as update timesheets.
Step 3
The selected work order is displayed. Click “Actions” and select "Resend Invitation."
Step 4
The Resend Invitation pop-up window is displayed. Verify the email address that is displayed in the Worker Email field is correct and then click "Resend."
View draft time sheets
You may need to view time sheets that have not yet been submitted by workers. Viewing draft time sheets for the prior week is a quick method of determining which workers have not submitted their time sheets and therefore, may not be appropriately invoiced.
Step 1
From the “View” menu, click “Time Sheet.”
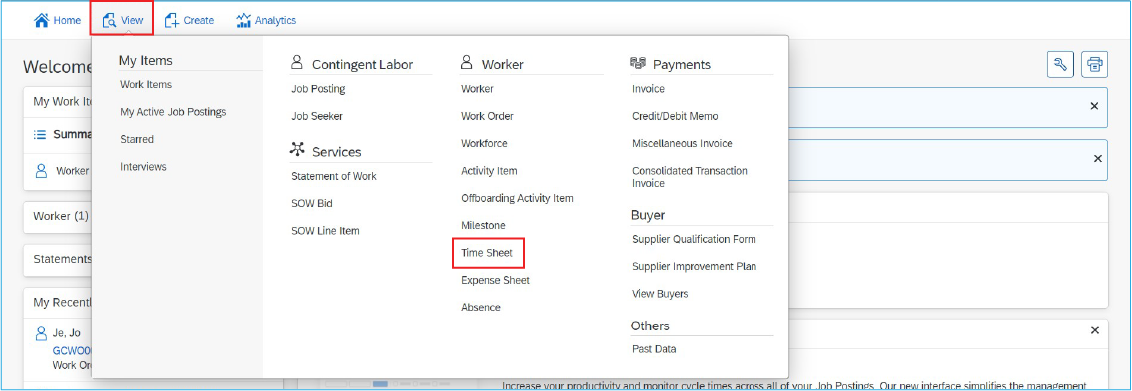
Step 2
The Time Sheets page is displayed. Click “Draft Time Sheets.”
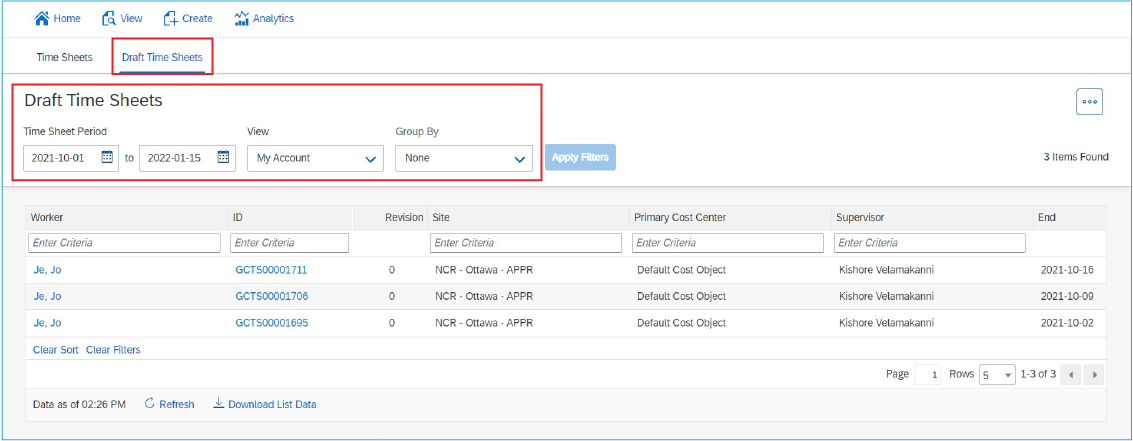
Step 3
Use the Time Sheet Period fields and the “Apply Filter” button to search for draft time sheets in a specific date range. Use the Group By: field to group draft time sheets. For example, you can group draft time sheets by worker, site, or supervisor.
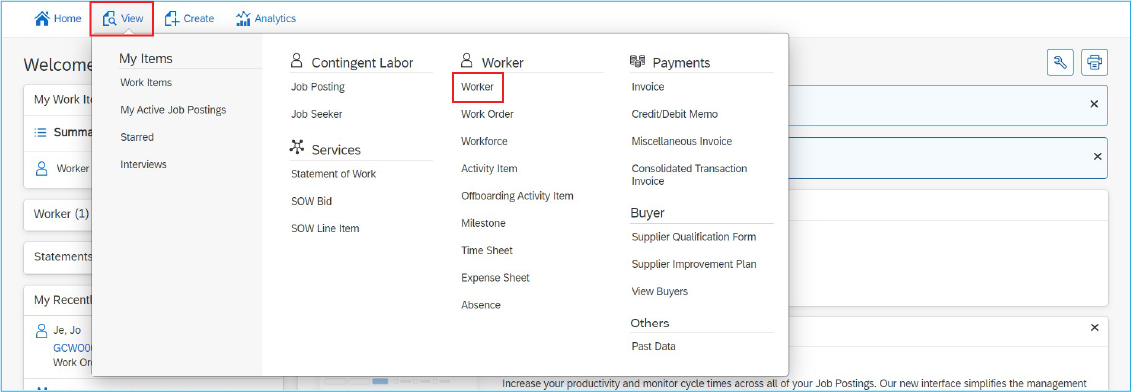
Submit a time sheet for a worker
If the buyer you are supporting uses auto-registration of workers, you can enter time sheets on behalf of the worker. You can also submit time sheets for non auto-registered workers if allowed by the buyer.
Step 1
From the View menu, select “Worker.”
Step 2
The Workers page is displayed. Click the ID of the worker for whom you want to submit a time sheet.
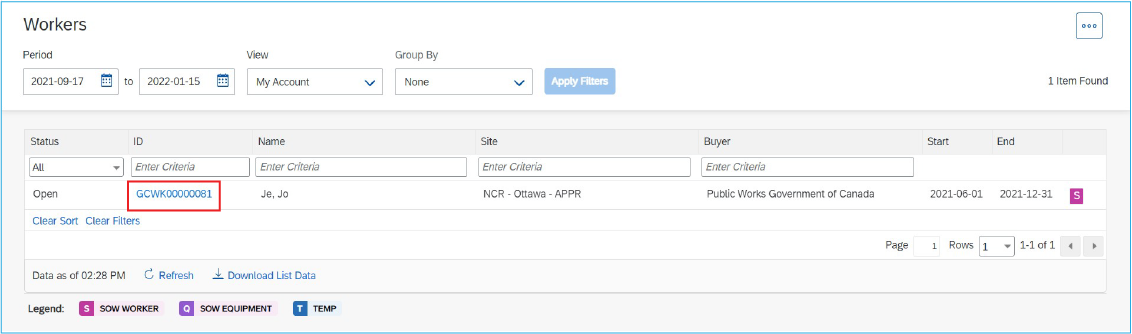
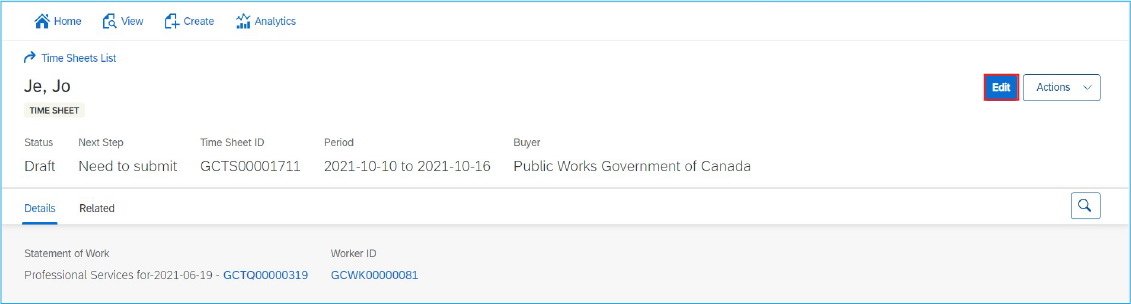
Step 3
The details of the selected worker are displayed. Click “Time & Expense” and click the ID for the time sheet you want to submit.

Step 5
Click “Edit.”
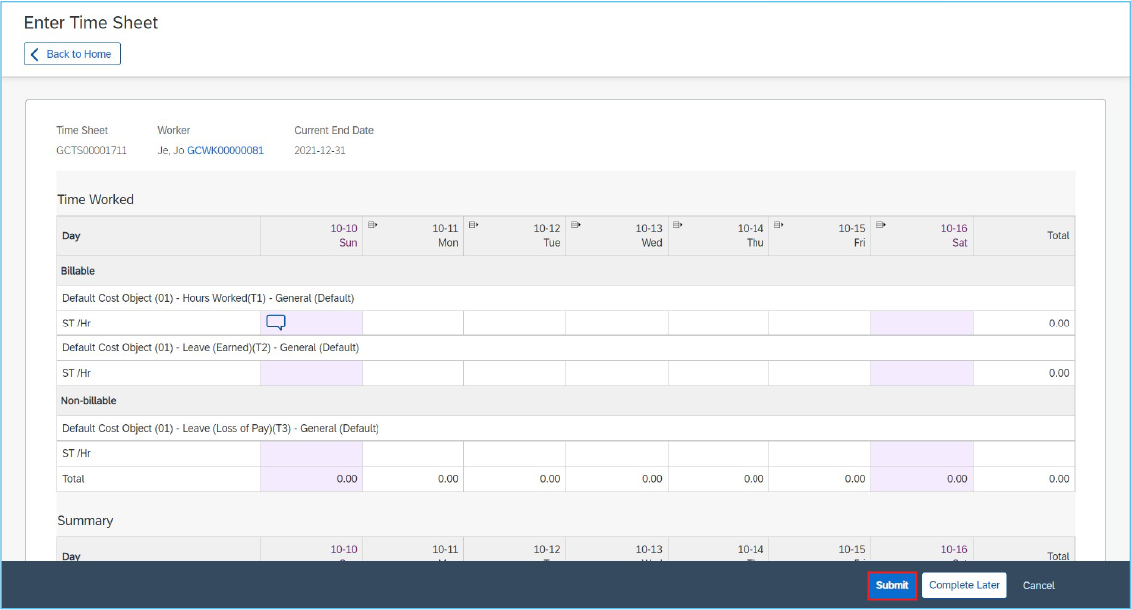
Step 6
You may be prompted to select task codes to enter time against. Complete the time sheet and click "Submit."
Run reports
Users with the appropriate user role permissions can run reports. Reporting access and visibility is controlled by your SAP Fieldglass system administrator. Follow the steps below to run a report.
Step 1
From the Analytics menu, click “All Reports.”
Step 2
The All Reports/All Folders page is displayed. Use the search fields and “Apply Filters” button to search for the report you want to view.
Step 3
Click the title of the required report. Refer to the list below for descriptions of the standard reports for suppliers.
| Report name | Description |
|---|---|
| Draft time sheets | Time sheets in a draft status. The filters used for this report are: Time Sheet Start/End Date, Buyer, Site, Business Unit, Cost Center, and Time Sheet Status. |
| Expense sheet status | List of all expense sheets within a given date range. The filters used for this report are: Expense Sheet Submit Date, Expense Sheet Status, Buyer, and Site. |
| Invoice details | Invoice details. The filters used for this report are: Invoice Submit Date, Invoice Status, Invoice Type, Buyer, and Site. |
| Invoice status | Invoice statuses. The filters used for this report are: Invoice Submit Date, Buyer, and Site. |
| Job posting status | General job posting information. The filters used for this report are: Job Posting Submit Date, Job Posting Status, Buyer, and Site. |
| Job seeker status | Statuses of job seekers within a submit date range. The filters used for this report are: Job Seeker Submit Date, Job Seeker Status, Buyer, Site, and Job Posting Status. |
| My performance | Your performance metrics (example: how long it took you to respond to a job posting).The filters used for this report are: Job Posting Submit Date, Buyer, and Site. |
| System users | Name, username, role, supervisor and proxy for those users created during a given date range. The filters used for this report are: User Create Date and User Status. |
| Time sheet status | Rates, dates, number of hours, and status. The filters used for this report are: Time Sheet Start/End Dates, Time Sheet Status, Buyer, and Site. |
| User role permissions | Number of users in the selected role(s) and allowed activities, by module. The filter used for this report is: Role. |
| Work order status | Rates, total billable hours, start/end dates, and status for the current WO. The filters used for this report are: Work Order Start/End Date, Work Order Status, Buyer, and Site. |
| Worker status | Dates, rates, and status. The filters used for this report are: Work Start/End Date, Worker Status, Buyer, and Site. |
Step 4
The selected report is displayed. Select filters and output formats, as required. The filters that are available will vary based on the report you selected.
Step 5
Click “Run.” You will leverage SAP Fieldglass to have real time visibility into your SOWs including assigned workers, time sheets, and submitted service receipts. It also enables you to view the progress of a milestone and your deliverables. You will also use SAP Fieldglass to communicate directly with the operational managers who are managing your contracts.
